Introduction
Mobile phones are often the centre of our digital world, and we routinely use the cloud to store images and other data. But when you need to store and share many hundreds of thousands of images? We could buy bulk storage from Apple, Azure, AWS or Google. It’s convenient but gets expensive fast. That’s where Synology’s range of network attached storage (NAS) devices come in. The NAS sits inside your home network, providing a private cloud so you can securely store, access and share your digital content.
A long term Synology user, my NAS have demonstrated their worth time and again at home and while traveling for storing and backing up image files, and as an option for remotely accessing travel or other documents in the event of a calamity. We no longer play CD’s or DVD’s, they have all been digitised to the NAS for consumption on media players around the house. Our digital life exists on our Synology devices, our private cloud.
The DS225+ is the latest addition, my fourth Synology NAS since 2010 and the third currently in service. Lets see what it has to offer.
What is a NAS exactly and why should you care?
In the simplest terms, a NAS is a small computer connected to your home network that can connect to other computers to share files. A file server lets say, that’s the most basic capability. However a small server can also run applications, run a webserver, provide secure access from inside and outside the network, backup data to another location automatically and much more. It’s yours to do what you want without the need for a subscription cloud service.
There’s no need to be an IT guru to install or get the most from it. The setup is straightforward and once it’s integrated into your home network, you likely won’t have to think about it much from that point. You can easily and securely connect with your phone and computers, either from inside or outside your home network. I’ve written more about the setup below and it’s definitely not rocket science to get started.
Enter the Synology DiskStation DS225+
Synology identify their products with the chassis type, drive capacity, year of release and where the model sits in the range from entry level to enterprise. The Synology DiskStation DS225+ is a recent update of their 2 drive bay models and is a small business class machine. With each product tier comes more performance and this one sits close to the top of the Synology performance tree for a 2 bay NAS. This means it has a strong processor (Intel Celeron J4125), 2G RAM upgradable to 6G, read performance of up to 282MB/s and write performance up to 217MB/s. To realise read and write performance potential the DS225+ is also equipped with 1 and 2.5 GbE ethernet ports. Performance is what makes this device so attractive at it’s price point and differentiates from lesser Synology two bay offerings. Form factor is compact and it’s quiet so it can sit unobtrusively on the desk alongside your computer.
NAS and imaging workflow considerations
An issue common to photographers and content creators everywhere is the performance of network storage. The gigabit network is what most people will have at home or at their office. This gives a theoretical throughput of 125MB/s. In real life it’s more like 110MB/s on a good day and that is too leisurely for working with image or video files in real time. 2.5GbE doubles that which helps explain the read and write performance of the DS225+ and transforms the experience with imaging applications.
I have three Synology products, a DS220j for backups, an RS815 the core storage device and hub for backups for now, and the DS225+ which is the machine supporting the imaging workstations. The table below was generated using Black magic speed test on a Mac and shows relative performance for write and read from each of the NAS devices. You can see the DS225+ more than twice as fast as the DS220j. The RS815 is demonstrably unsuited to the task of sharing files with ON1 on the workstations lacking sufficient read/write performance. The DS225+ is running at 2.5GbE, the other two are gigabit ethernet only.
| Device | Read MB/s (download) | Write MB/s (upload) | Device Throuput Max (MB/s) | Network Theoretical Max (MB/s) |
|---|---|---|---|---|
| DS220j | 106.2 | 102.8 | 112 MB/s read/write | 1 GbE 125 |
| RS815 | 63 | 62.2 | 216.7 MB/s read and 121.1 MB/s write | 1 GbE 125 |
| DS225+ | 263.4 | 267.8 | 282 MB/s read and 217 MB/s write | 2.5 GbE 312.5 |
With hundreds of thousands of images and their associated sidecar or other support files in the image library, read performance is important for smooth operation of the imaging application. Too slow and you’ll be watching the application loading files or if you are searching across a big image library to locate all the files matching your search, you will be waiting a while for the search to complete. Now that imaging applications are incorporating AI for metadata tagging, this adds additional read/write overhead. Scrolling through images is tedious with insufficient read performance.
You might wonder why just putting image files on the local hard drive is not a consideration and that’s a great question. In my case I share files on the NAS between workstations which works better than just sharing local drives across the network. Mac users know that the internal drive is never going to be big enough and external storage of some sort is always going to be required anyway. Network attached storage is the best compromise in these cases with the tradeoff being outright performance compared to onboard storage or even a large USB flash drive. Application performance is perfectly fine with the DS225+ thanks in part to it’s 2.5GbE network connection.
ON1 performance is now instantaneous on both a Mac mini M2 and i7 PC sharing the image library on the DS225+. The NAS read/write performance combined with 2.5 GbE networking provides a significant productivity gain.
Considerations for setting up the DS225+
My DS225+ is equipped with 2x 4TB Synology Plus Series hard drives. Synology state that from 2025, Plus level devices upwards must use Synology branded storage to deliver the reliability and performance business and enterprise users expect. Home users of the Plus series products have expressed resistance to this policy but as a person involved in enterprise service management for decades, this is a common practice with vendors of enterprise equipment and makes good sense. In practise the Plus series drives cost about the same as similar products from other vendors.
The DS225+ front cover is held in place with rubber grommets and is easily removed. Behind the cover are two plastic trays into which the drives sit and are retained with plastic slides for the trays which easily clip into place. Drives then slide into the DS225+ and click into place. Drive installation is completely tool-less and easy.
Installing the NAS onto the network is similarly painless, however there are some decisions to be made first since performance depends on choices made while setting up.
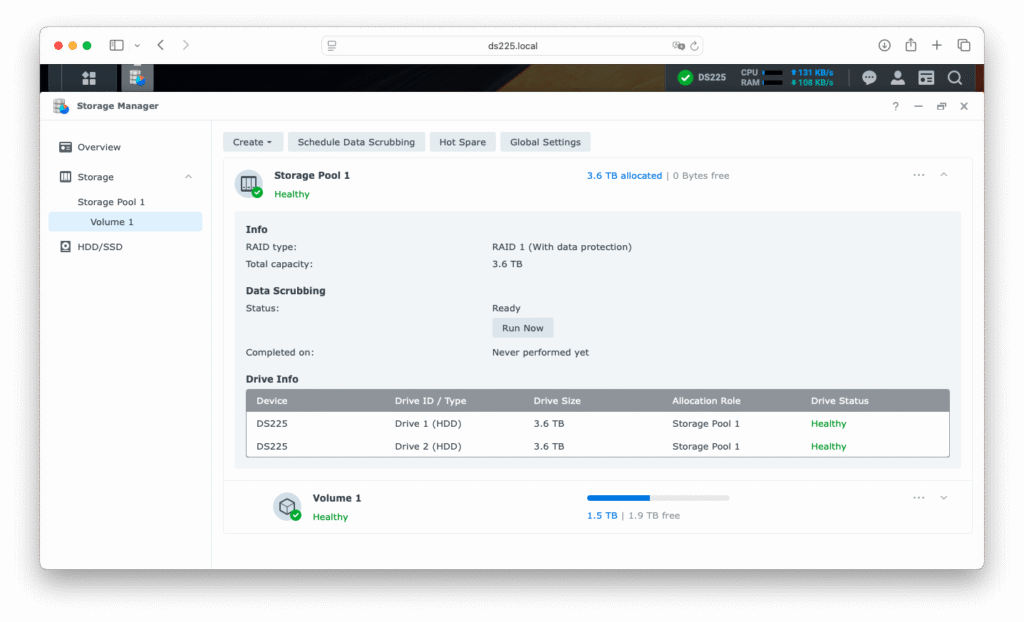
With 2x hard drives the options exist either for maximum storage space or a level of redundancy with mirrored drives. Synology advise that the best performance is in RAID 1 configuration. Synology Hybrid Raid (SHR) is also an option and the default but if you are maximising performance RAID 1 is recommended. Setup will recommend the BTRFS file system which provides additional fault tolerance, management, and data protection compared to the ext4 file system making BTRFS the obvious choice.
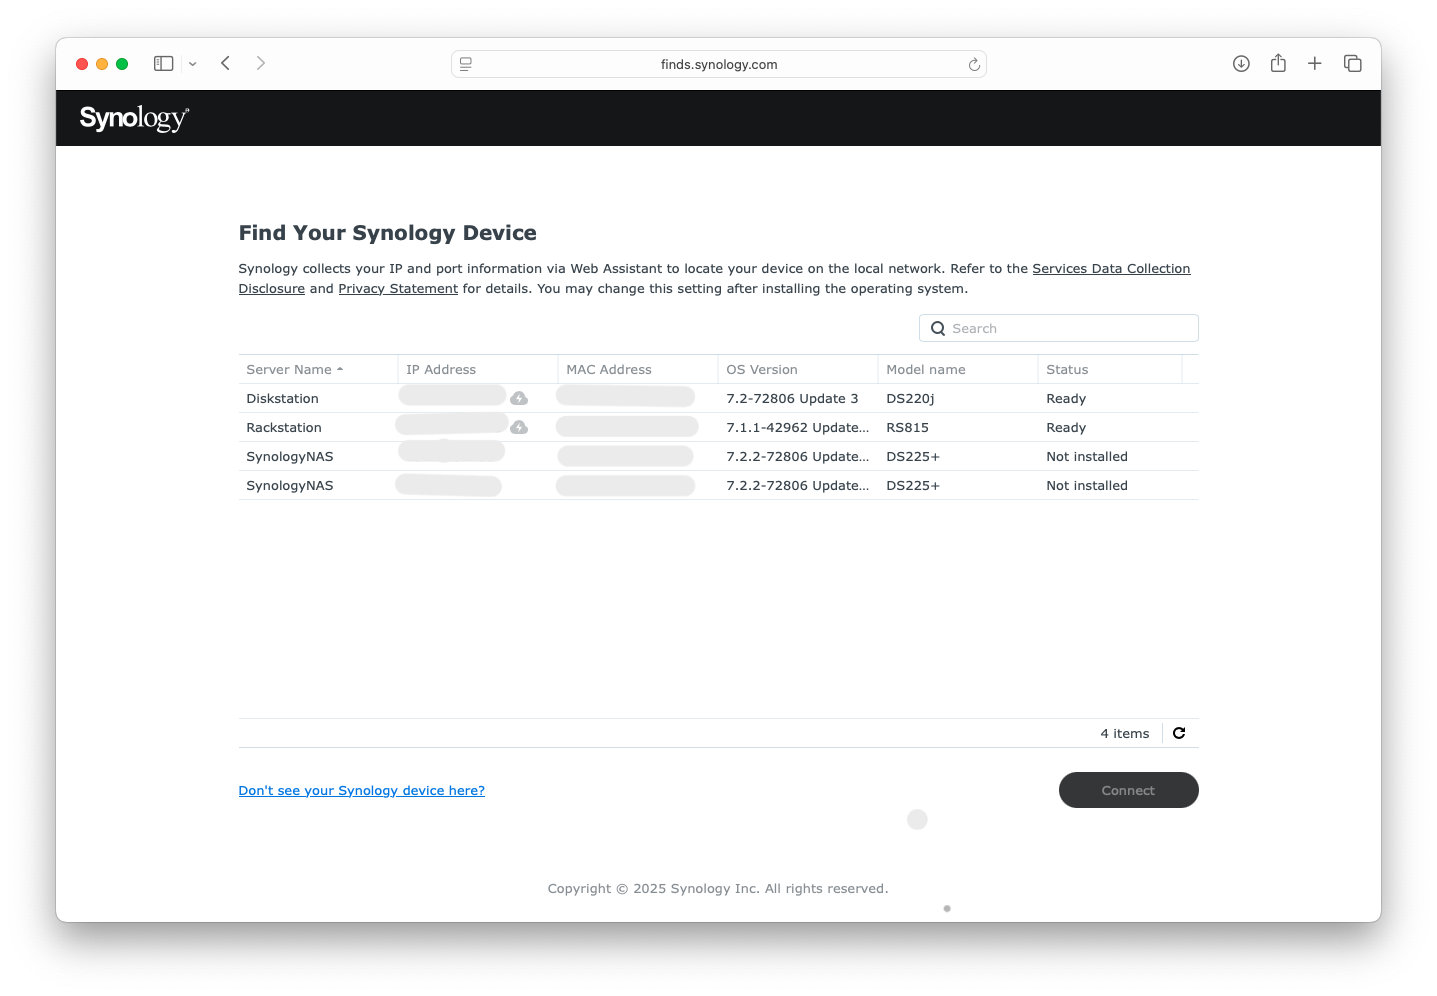
Connect the DS225+ from the left 2.5GbE ethernet port to your network and power it up. It will boot and take a few minutes to be ready for installation. To kick off the DSM operating system installation, Synology provide a card with a QR code that I found unhelpful and instead used this url: https://finds.synology.com/# which located the device and from there I was able to commence the installation.
I used the settings mentioned and created a single volume with mirrored disks (RAID 1).
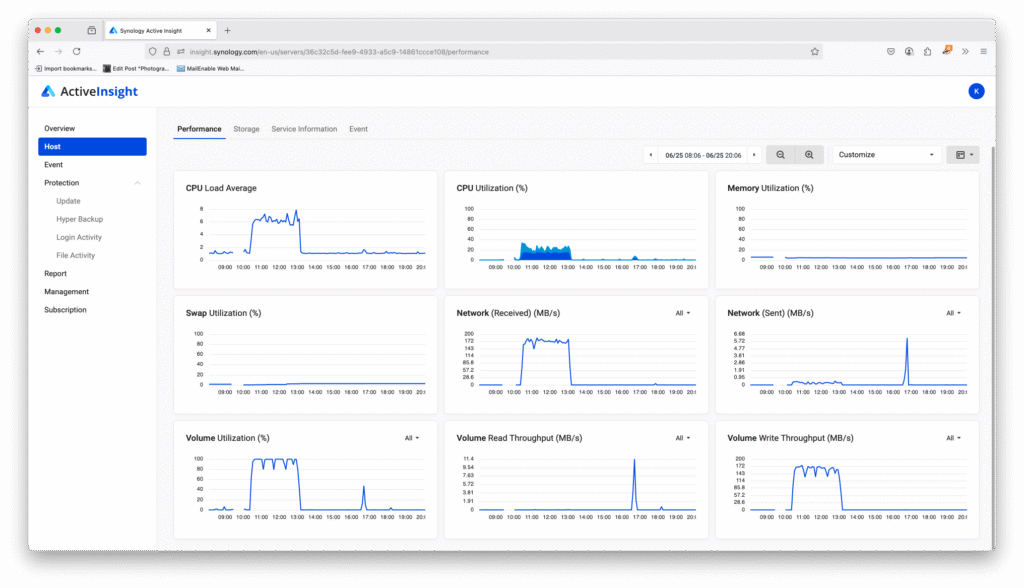
Together with the 2.5GbE LAN connectivity which includes 2.5GbE ethernet ports on the Mac and PC connected via a 2.5GbE switch and then back to a 2.5GbE port on the router, I had plenty of performance. But more performance awaits. The DS225+ also has expansion capacity for an additional 4GB RAM. The internet advised: “More RAM allows the NAS to cache frequently accessed data, reducing the need to access slower hard drives for those requests. This leads to faster response times and overall snappier performance”. Obviously, I needed to check this out and so installed additional memory and did see a noticeable performance improvement. Specifically, the NAS ran out of memory when indexing the image library prior to the memory upgrade (nearly 300000 files). Problem solved after the memory upgrade and the numbers shown earlier include the extra memory.
Initialising your new Synology DiskStation
The main steps to initialising your new Synology DiskStation NAS are shown below. It’s easier than you think, but do take the time to understand the options before making a selection. In some cases you can skip and go back after installation to enable them. Others may need you to start again. It’s not difficult, just take your time and stop and read the help if you are unsure.


Data management – backups and remote access
Just having a NAS does not mean your data is safe from a calamity. A data management strategy is required to ensure your data exists in at least two other places and one of them preferably off site – which sounds like a bit of a nuisance. If only there was some way to automate this important task. Fortunately, Synology are way ahead of you and the DSM tool set includes a suite of data management tools.
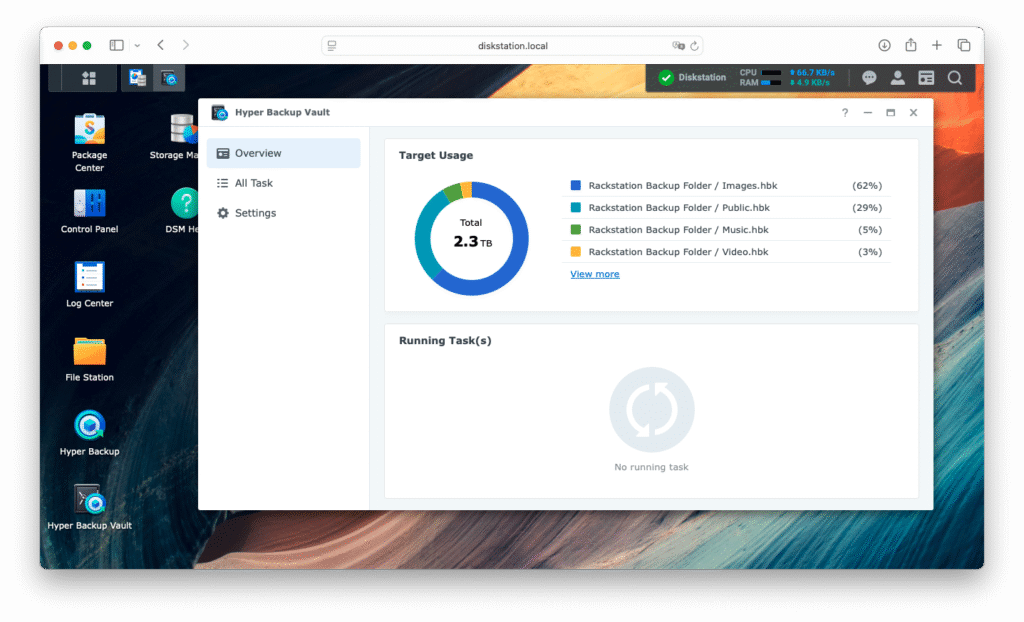
In my case the DS220j is where the backups are stored with the NAS out in the backyard shed. A copy of the image library is on the RS815 and this is what is backed up to the DS220j. All of this is automated using Synology Hyper Backup in conjunction with Hyper Backup Vault.
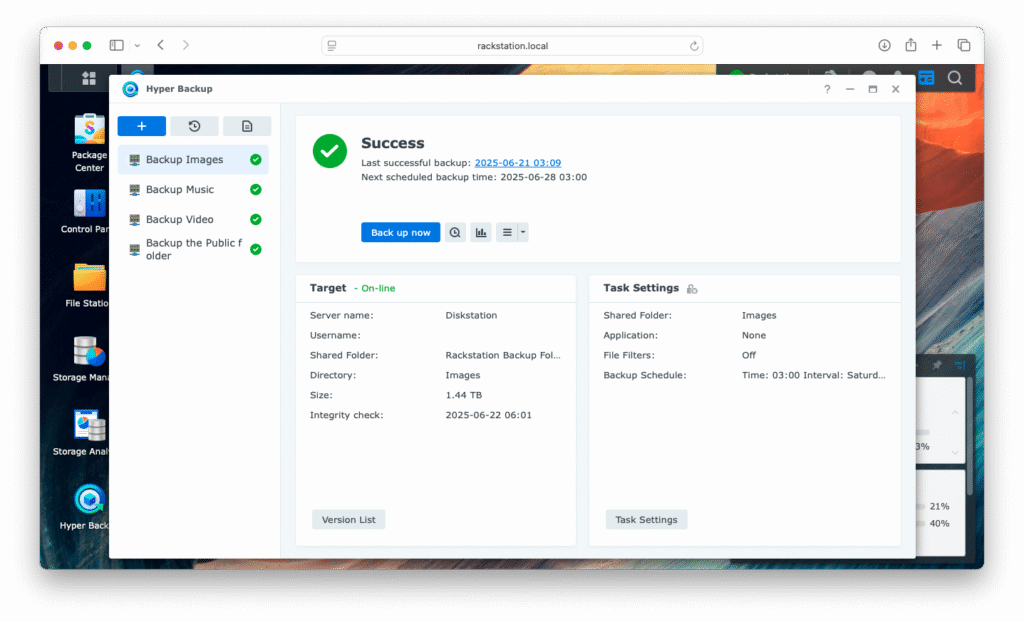
On the 220j Hyper Backup Vault is running and together they take care of managing automated backups. If you want to learn more about how this works, check out Synology documentation here: https://kb.synology.com/en-global/DSM/tutorial/Quick_Start_Hyper_Backup. It’s not difficult to setup and it works reliably. It’s saved me once when I accidentally deleted 12 months worth of images. I was able to quickly restore and move on.
Synology, remote access and other tools
While it’s awesome to have your image library on a NAS, how does that help if lets say you are overseas taking pictures. Once again Synology have you covered with Synology Drive which facilitates syncing and backup tasks and this is how the laptop sends it’s files back to the image library on the NAS when it’s out in the field. Remote access is facilitated using Quickconnect which you will find under External Access in the Control panel. It’s something well worth looking into.
https://www.synology.com/en-au/dsm/feature/drive
Another benefit is access to travel documents from my phone or laptop using Synology Drive. In the event the phone or laptop is lost or stolen, I can access the information again simply by installing and configuring Synology Drive on another device. And for sure other cloud services can do this, but since I have my own private cloud thanks to Synology, I have no need of third party cloud services. This is something I have been doing for a long time and it just works.
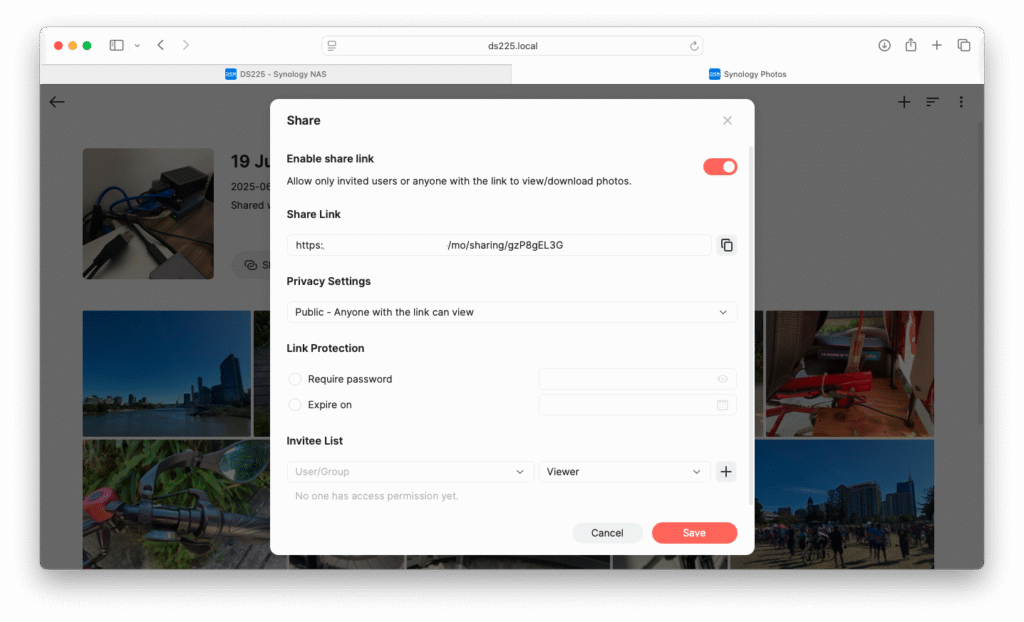
But what about sharing photos I hear you say. Synology provide the Synology Photos application which is a quick and easy way to share images. It runs from the NAS and permits sharing of images for viewing or download. If you are a photographer with your own website then you’ll likely share images using a private area of your website. Nonetheless, Synology Photos is a built in alternative.
For casual photographers or even a pro in a pinch, it’s a good option. It has sufficient security controls to manage viewing from public to private, read only or download. It’s another convenient tool that comes with the NAS.
https://www.synology.com/en-global/dsm/feature/photos
Conclusion
There’s only just so much that can be said about a product with so much depth and capability in a short article so I have just skimmed across the top of a few key points of interest to photographers across the spectrum of use cases.
Things I’ve learned along the way:
- The DS225+ properly configured delivers sufficient performance to make it a proper consideration as a central image file sharing platform for a small workgroup.
- Decide before setting up whether you prefer all the performance or a balance of safety. This will inform setup configuration decisions.
- Once setup, test and make sure you are happy with performance before putting the unit into production. While you can safely make some changes to the array configuration in production, there are some options that will destroy data especially on a two disk NAS. So understand the risks associated with change down the track and take the time to get it right up front.
- The price of 2.5GbE networking is affordable and provides a decent performance boost. It’s well worth considering with the DS225+ which has native 2.5GbE networking.
- Synology provide good options for data management, automated backups, sharing and remote access with the DS225+. Check them out thoroughly and learn how to use them, especially the automated backup capability.
- Consider a second device as a backup target.
- Finally, add the memory. With large amounts of files it made a big difference to performance.
The DS225+ is easily fast enough to deliver good performance for image management with my preferred imaging application ON1. From experience I had a very clear idea of what I needed and the DS225+ optimised for performance including a memory upgrade and connection to a 2.5GbE network effortlessly shares a big image library between two workstations and provides workable application performance. This is something the RS815 could not do even though it remains a perfectly capable device. While a 10GbE capable NAS would be even better again, the DS225+ strikes a good balance of performance and price. The value is strong with this one.